How to Send ServiceNow Incident Alerts to Microsoft Teams Using Power Automate
Many IT operations teams receive scheduled incident reports from ServiceNow as CSV email attachments. Instead of manually opening the report, finding P1/P2-style incidents, copying their details, and posting them into Microsoft Teams, you can automate the process with Power Automate.
What We Are Building
This tutorial focuses on a common IT operations workflow: a ServiceNow report is generated on a schedule and delivered to an Outlook mailbox as a CSV attachment.
The traditional process requires an operations engineer to manually open the report, identify high-priority incidents, read the important fields, and then post the relevant information into Microsoft Teams.
The manual process typically looks like this:
- Receive the scheduled ServiceNow incident report by email.
- Open the CSV attachment.
- Search for high-priority incidents.
- Review incident information such as number, priority, short description, assignment group, status, caller, and description.
- Copy the relevant information.
- Open the appropriate Microsoft Teams conversation or channel.
- Manually post the incident information for the operations team.
This is exactly the type of repetitive workflow that Power Automate can handle.
The goal is to create an automated path where the scheduled incident report becomes the input, Power Automate processes the CSV, high-priority incidents are identified, and the selected information is delivered to Microsoft Teams without requiring someone to manually monitor the report.
The final architecture looks like this:
ServiceNow Scheduled Report
          │
          ▼
   Outlook Email
          │
          ▼
   CSV Attachment
          │
          ▼
    Power Automate
          │
          ├── Validate Attachment
          │
          ├── Convert Base64 → Text
          │
          ├── Clean CSV Content
          │
          ├── Split CSV into Rows
          │
          ├── Skip Header
          │
          ├── Split Rows into Columns
          │
          ├── Check Incident Priority
          │
          └── Filter High/Critical Incidents
                       │
                       ▼
              Microsoft Teams Alert
What You Will Need
- An Outlook mailbox receiving the scheduled incident report.
- A CSV attachment containing the incident information.
- Microsoft Power Automate.
- Microsoft Teams.
- Permission to create and run the required Power Automate flow.
- A predictable CSV structure.
Before you start:
This tutorial assumes that the incoming CSV has a predictable structure and that its fields can safely be separated using commas. If your export contains complex quoted fields, commas inside field values, embedded line breaks, or complicated escaping, the simple split()-based approach shown here may not be suitable. See the limitations section before using this pattern in production.
What makes this approach useful?
The workflow uses the scheduled email as a lightweight event source. Instead of building a direct integration between ServiceNow and Teams, the existing report delivery mechanism becomes the input to Power Automate. This can be useful when direct integration options are restricted or when the organization already relies on scheduled ServiceNow reports.
Full Flow Visualization
Below is a visual representation of the complete automation flow:
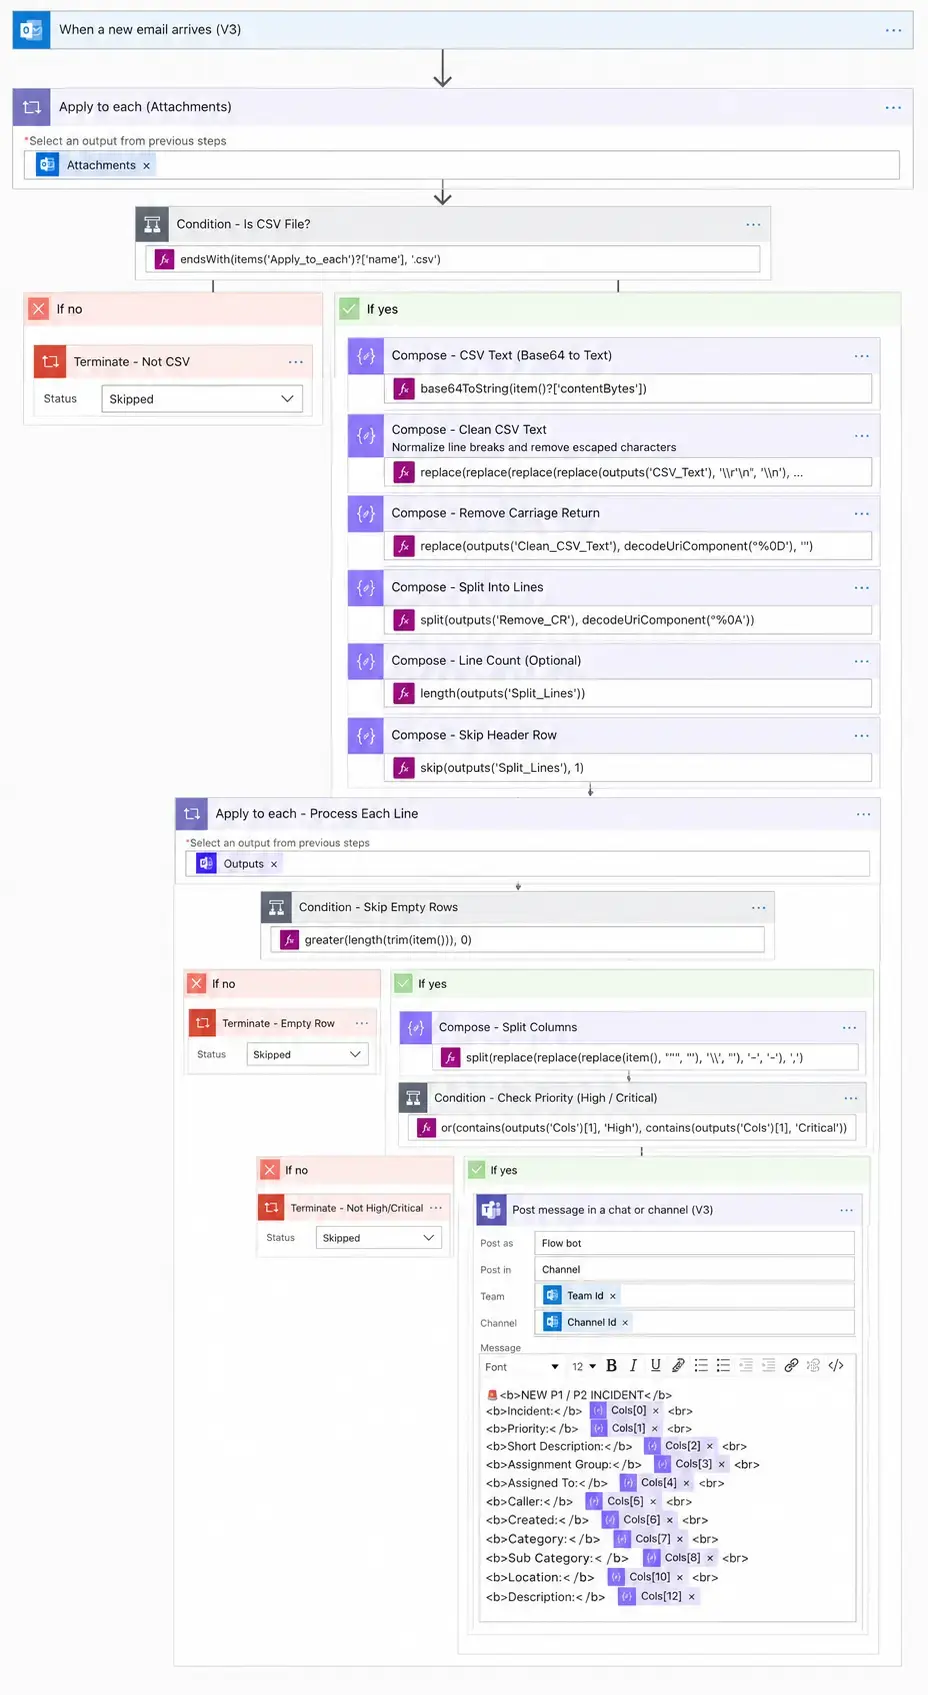
The result is a lightweight incident notification workflow. Instead of repeatedly monitoring a scheduled report and manually forwarding important incidents, the operations team receives the selected alerts directly in Teams.
Why Automate ServiceNow Incident Processing?
A scheduled ServiceNow report may contain dozens or hundreds of incidents, while only a small number may require immediate attention from an operations team.
Manually searching the report for priority values introduces repetitive work and creates an additional step between the report arriving and the team being notified.
Power Automate can perform the repetitive filtering automatically.
Manual vs. Automated Process
| Manual Process | Automated Process |
|---|---|
| Receive scheduled ServiceNow report | Outlook trigger detects the email |
| Open CSV attachment | Power Automate processes the attachment |
| Search for P1/P2-style incidents | Flow checks the priority automatically |
| Copy incident information | Required fields are extracted automatically |
| Open Microsoft Teams | Teams action posts the alert |
⚡ Operational Impact
Automating the workflow reduces repetitive manual work and shortens the time between report arrival, incident identification, and notification. It can help reduce the manual effort involved in the initial alerting process and may improve time to acknowledgement when the receiving team acts on the notification promptly.
However, this workflow by itself does not prove a reduction in MTTR or MTTA. Those metrics depend on the organization's incident process, response behavior, and measurement methodology.
Prerequisites
To build a similar workflow, you will need:
- Microsoft Power Automate.
- Microsoft Outlook / Microsoft 365.
- Microsoft Teams.
- A scheduled ServiceNow report or another ITSM report delivered as a CSV attachment.
- A consistent CSV structure.
- Permission to create Power Automate flows.
For this example, assume that the CSV contains fields such as:
Incident,Priority,Short Description,Assignment Group,Assigned To,Caller,Created,Category,Sub Category,Location,DescriptionYour actual ServiceNow export can contain different fields. The important requirement is that the column positions remain predictable so that the expressions used later in the flow match the correct fields.
Step 1: Trigger the Power Automate Flow
Start with the Outlook trigger: When a new email arrives (V3).
Configure the trigger so that only the scheduled incident reports are processed.
- Email folder: Inbox or a dedicated incident-report folder.
- Subject filter: use the subject generated by the ServiceNow scheduled report.
- Include Attachments: Yes.
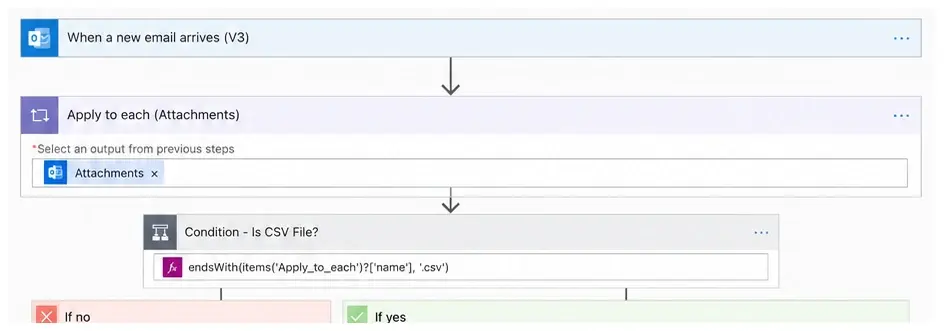
Why use a subject filter? Without filtering, every email arriving in the monitored mailbox could trigger the flow. A subject filter helps ensure that unrelated messages do not start unnecessary flow runs.
Step 2: Process Email Attachments
An email can contain multiple attachments. Therefore, use an Apply to each action to process the attachments individually.
The flow should verify that the attachment is a CSV before processing it.
Expression:
endsWith(items('Apply_to_each')?['name'], '.csv')If the attachment is not a CSV, the No branch can simply perform no processing for that attachment.
Avoid terminating the entire flow for a non-CSV attachment if the same email could contain another valid CSV attachment.
Step 3: Convert the CSV Attachment from Base64 to Text
Email attachment content is provided to Power Automate as encoded content. Before the CSV can be processed as text, convert the attachment content into a string.
Use a Compose action with:
base64ToString(item()?['contentBytes'])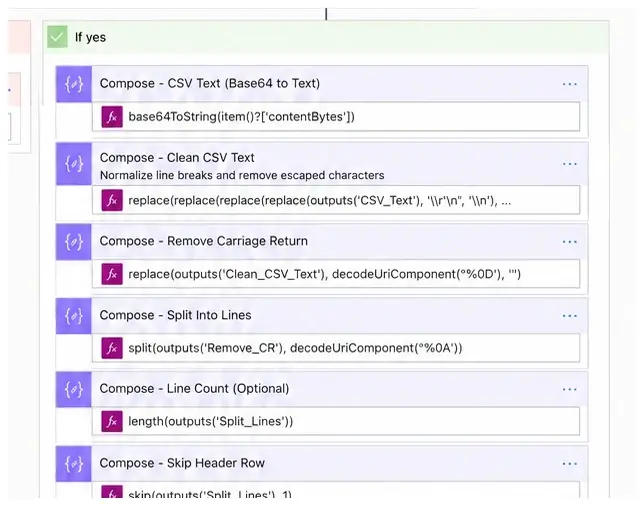
Step 4: Clean the CSV Content
CSV files generated by enterprise systems can contain Windows-style line endings. Normalize the line endings before splitting the file into rows.
replace(
    replace(
        outputs('CSV_Text'),
        decodeUriComponent('%0D%0A'),
        decodeUriComponent('%0A')
    ),
    decodeUriComponent('%0D'),
    ''
)
%0A represents a line-feed character and %0D represents a carriage return.
Step 5: Handle Windows Line Breaks
Windows commonly represents a new line using \r\n. If carriage returns remain after the first cleanup step, remove them before splitting the CSV.
replace(
    outputs('Clean_CSV_Text'),
    decodeUriComponent('%0D'),
    ''
)
Step 6: Split the CSV into Rows
Once the CSV has been normalized, split the text at each newline to create an array containing individual rows.
split(
    outputs('Remove_CR'),
    decodeUriComponent('%0A')
)
Optional: Count the CSV Rows for Testing
During development and troubleshooting, you can verify how many lines Power Automate has identified.
length(outputs('CSV_Lines'))Step 8: Skip the CSV Header
The first item in the array represents the column headers. Skip it before processing the actual incident records.
skip(outputs('CSV_Lines'), 1)Optional: Inspect the First Data Row
During development, you can inspect the first incident row without processing the entire dataset.
first(skip(outputs('CSV_Lines'), 1))Step 10: Ignore Empty Rows
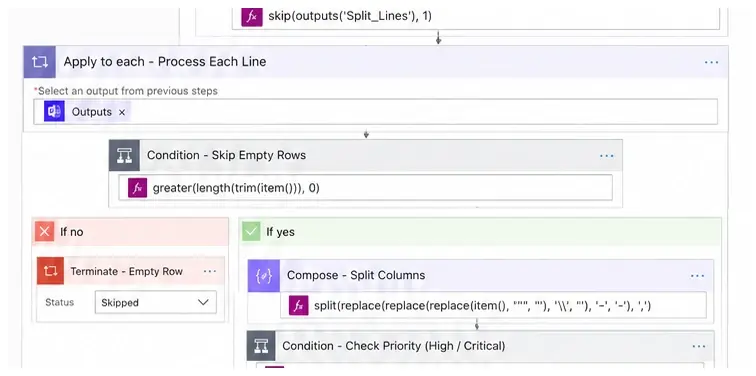
CSV files can contain trailing blank lines. Add a condition so that only rows containing actual data continue through the parsing logic.
greater(
    length(trim(item())),
    0
)
Step 11: Split Each Incident into Columns
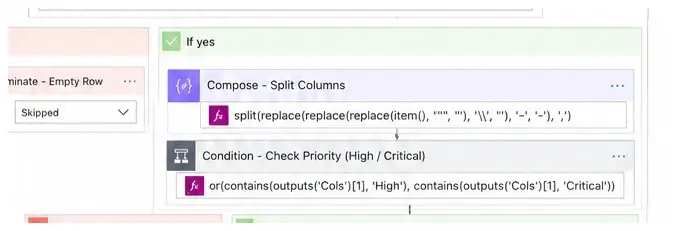
Inside the row-processing loop, the example flow removes simple quote and backslash artifacts before separating the fields by commas.
split(
    replace(
        replace(item(), '"', ''),
        '\\',
        ''
    ),
    ','
)
Important:
This is a deliberately simple parsing technique. It assumes that commas are not being used as data inside individual CSV fields. If your ServiceNow export contains quoted fields such as "Server down, impact high", a simple comma split can produce incorrect column positions.
Step 12: Access Individual CSV Columns
The example CSV contains 11 fields, so the zero-based indexes run from 0 through 10.
Keep this mapping synchronized with the actual ServiceNow report configuration.
| Index Expression | Target CSV Field |
|---|---|
outputs('Cols')[0] |
Incident |
outputs('Cols')[1] |
Priority |
outputs('Cols')[2] |
Short Description |
outputs('Cols')[3] |
Assignment Group |
outputs('Cols')[4] |
Assigned To |
outputs('Cols')[5] |
Caller |
outputs('Cols')[6] |
Created |
outputs('Cols')[7] |
Category |
outputs('Cols')[8] |
Sub Category |
outputs('Cols')[9] |
Location |
outputs('Cols')[10] |
Description |
Step 13: Filter High and Critical Incidents
The next step is to decide which incidents should generate a Teams notification.
In this example, the flow checks the priority column and continues only when the value contains High or Critical.
or(
    contains(outputs('Cols')[1], 'High'),
    contains(outputs('Cols')[1], 'Critical')
)
The exact terminology used by ServiceNow depends on how your organization's incident priorities and scheduled reports are configured.
Therefore, do not assume that every ServiceNow instance uses the same labels. Modify the condition to match the actual values present in your export.
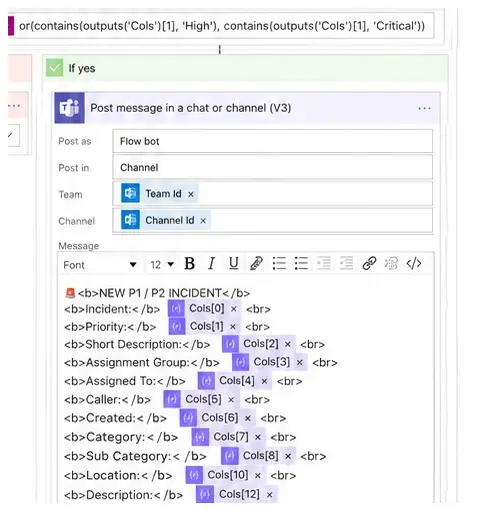
Step 14: Send the Incident to Microsoft Teams
Once an incident passes the priority condition, use the Teams connector action: Post message in a chat or channel.
Insert the extracted incident fields into the message so that the receiving team has enough context to understand the alert without opening the original report.
⚠️ Alternative Approach: When the Teams Flow Bot Isn't Available
If your Power Automate environment does not provide the required Microsoft Teams action because the Teams flow bot or related integration is not enabled by your administrator, you can still implement the incident-alerting workflow.
Another Approach in case you don't have the Teams flowbot enabled
Usually, this involves using alternative methods to post messages to Microsoft Teams channel if you have one for your team if not then don't worry we will use the outlook mails in this approach they cannot stop us entirely.
Check out the alternative approachExample Microsoft Teams Alert
When a matching incident is detected, the operations channel can receive a formatted notification similar to:
🚨 NEW HIGH-PRIORITY INCIDENT
Incident: INC[Number]
Priority: Critical
Short Description: Demo Short Description
Assignment Group: Infrastructure Operations
Assigned To: Engineer A
Caller: User A
Created: [Created Date]
Category: Demo - Infrastructure
Sub Category: Demo - Server
Location: Demo - Data Center
Description: Demo Description
Complete Power Automate Workflow
The complete control flow can be summarized as follows:
┌──────────────────────────────┐
│  ServiceNow Scheduled Report │
└──────────────┬───────────────┘
               │
               ▼
┌──────────────────────────────┐
│       Outlook Email          │
│       Trigger                │
└──────────────┬───────────────┘
               │
               ▼
┌──────────────────────────────┐
│      Get Attachments         │
└──────────────┬───────────────┘
               │
               ▼
┌──────────────────────────────┐
│   Loop Through Attachments   │
└──────────────┬───────────────┘
               │
               ▼
          Is it CSV?
          /         \
        No           Yes
        │             │
        ▼             ▼
      Ignore     Base64 → Text
                       │
                       ▼
                 Clean CSV Text
                       │
                       ▼
                 Split into Rows
                       │
                       ▼
                  Skip Header
                       │
                       ▼
               Process Each Row
                       │
                       ▼
                  Empty Row?
                   /      \
                 Yes       No
                 │          │
                 ▼          ▼
               Ignore   Split Columns
                             │
                             ▼
                       Check Priority
                        /          \
                     Other      High/Critical
                       │             │
                       ▼             ▼
                    Ignore     Teams Message
Key Power Automate Expressions
| Function | Purpose |
|---|---|
base64ToString() |
Converts Base64 attachment data to readable text. |
replace() |
Replaces unwanted characters or formatting. |
decodeUriComponent() |
Generates characters such as line breaks. |
split() |
Splits text into rows or columns. |
skip() |
Skips the CSV header row. |
first() |
Retrieves the first item from an array. |
length() |
Counts characters or array items. |
trim() |
Removes leading and trailing whitespace. |
endsWith() |
Checks whether a filename ends with .csv. |
contains() |
Checks whether text contains a specific value. |
or() |
Combines multiple logical conditions. |
greater() |
Compares numeric values. |
Common Problems & Troubleshooting
CSV attachment isn't readable
Check that the Outlook trigger includes attachments and that the correct attachment content is passed to base64ToString().
CSV rows aren't splitting correctly
Check the line endings. Windows commonly uses \r\n. Normalize the line endings before calling split().
Header is being processed as an incident
Ensure the array passed to the processing loop uses:
skip(outputs('CSV_Lines'), 1).
Blank Teams messages are being generated
Add a condition using greater(length(trim(item())), 0) so that empty rows are ignored.
Incorrect fields appear in Teams
Verify the column indexes against the current ServiceNow CSV export. If the report configuration changes the column order, the positional expressions must also be updated.
Some incident fields are shifted into the wrong columns
Check whether the CSV contains commas inside quoted field values. The simple split() method used in this tutorial cannot reliably distinguish a comma that separates columns from a comma that belongs inside a quoted field.
Important Limitations
1. This is a simple CSV parsing approach
This tutorial intentionally uses Power Automate string expressions rather than a dedicated CSV parser. That keeps the workflow relatively easy to understand and reproduce, but it also means the approach works best when the CSV structure is simple and predictable.
2. Commas inside fields
Consider a field such as:
"Server down, impact high".
A plain split(item(), ',') operation can treat the comma inside that value as a column separator. The resulting indexes can therefore become incorrect.
For that reason, this approach should be considered suitable for controlled or predictable CSV exports rather than a full RFC-compliant CSV parser.
3. Embedded line breaks and complex quoting
CSV fields can also contain embedded line breaks or escaped quotation marks. Those cases require additional parsing logic and are outside the scope of this implementation.
4. ServiceNow configurations vary
The exact priority values, field names, scheduled-report format, email subject, and available Microsoft integrations can differ between organizations. Treat the expressions in this article as an implementation pattern and adapt them to your environment.
5. Licensing and organizational policies
This workflow does not require a separate third-party integration platform in the architecture described here. However, Microsoft 365 and Power Automate licensing, connector availability, Teams policies, security controls, and administrator restrictions can vary between environments.
How This Automation Helps IT Operations
- Incident Alerting: Push selected high-priority incidents to operational Teams channels.
- ServiceNow Report Processing: Automatically process scheduled incident exports delivered through email.
- Operational Notifications: Reduce the need for engineers to repeatedly monitor scheduled reports.
- Incident Triage: Surface selected priority incidents so the appropriate team can begin reviewing them sooner.
- Report-Based Automation: Reuse the same pattern for other predictable CSV-based operational reports.
Best Practices
- Keep the CSV schema consistent: Avoid changing column positions without updating the Power Automate expressions.
- Validate incoming attachments: Check the file extension and consider additional validation such as file size where appropriate.
- Filter early: Use the email subject and attachment checks to avoid processing unrelated messages.
- Handle empty records: Filter empty lines before attempting to split columns.
- Test special characters: Verify quotes, commas, carriage returns, line breaks, and other characters that may appear in the export.
- Add error handling: Consider using Power Automate Scope actions for error handling and troubleshooting.
- Protect sensitive information: Only post the incident fields that the receiving Teams audience actually needs.
- Test with realistic reports: Do not test only with a two-row CSV. Use representative data containing the same field structure and formatting as the real scheduled report.
Frequently Asked Questions
1. Can Power Automate read CSV files?
Yes. Power Automate can process CSV content as text using expressions such as base64ToString(), replace(), and split(). For complex CSV structures, a dedicated parsing approach may be preferable.
2. How do I convert a CSV attachment to text in Power Automate?
If the attachment content is available as Base64, use base64ToString(item()?['contentBytes']).
3. How do I split CSV rows in Power Automate?
After converting the CSV to text, use split(csvText, decodeUriComponent('%0A')) to create an array of rows.
4. How do I skip the CSV header in Power Automate?
Use skip(outputs('CSV_Lines'), 1) to remove the first item from the array.
5. How do I filter CSV incident data in Power Automate?
After splitting a row into columns, use conditions such as contains(outputs('Cols')[1], 'Critical'). Multiple conditions can be combined using or().
6. Can Power Automate send CSV data to Microsoft Teams?
Yes. Once the CSV has been converted and parsed, the extracted fields can be inserted into a Post message in a chat or channel Teams action.
7. Can this workflow work with ServiceNow incident reports?
Yes. If ServiceNow provides incident information through a scheduled CSV report delivered by email, Power Automate can process the attachment, filter selected incidents, and send the relevant information to Microsoft Teams.
8. Does this require a third-party integration service?
The architecture described here uses Outlook, Power Automate, and Microsoft Teams rather than requiring a separate third-party integration platform. Licensing and administrator policies can still vary by organization.
9. What is the difference between CSV and Excel in Power Automate?
CSV is plain text separated by delimiters, while Excel .xlsx files contain structured worksheets and tables. CSV can be manually parsed with text functions, while Excel data is generally better handled through Power Automate's Excel connector.